Snacks
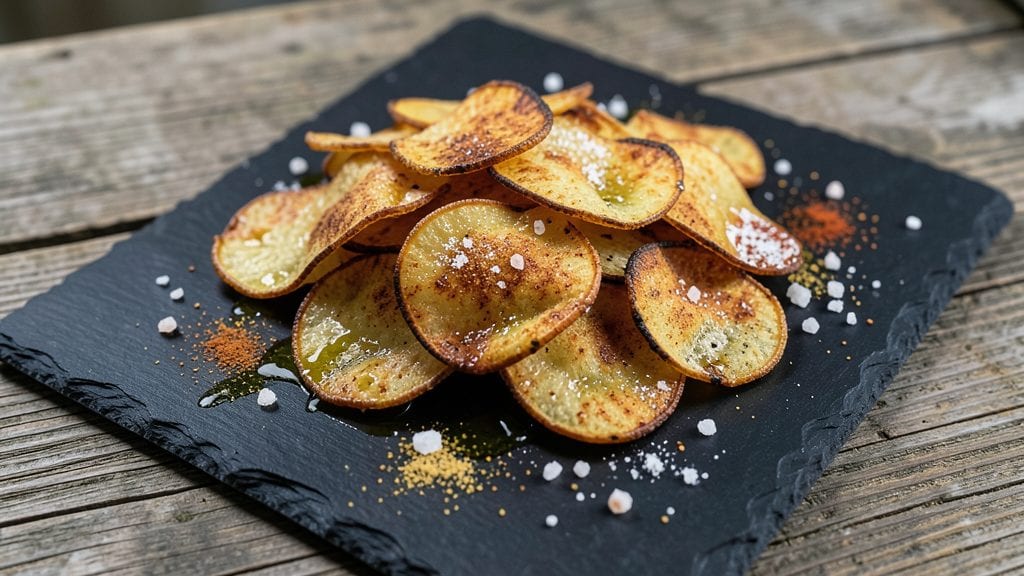
Making homemade roasted potato chips without deep-frying is easier than you think—and the results are crispier than store-bought. The secret lies in selecting the right potato variety and slicing them uniformly, then roasting them until golden perfection.
I’ve perfected this method over years of trial and error, and it delivers that satisfying crunch without the mess or guilt of oil splatter.
This recipe works best with russet potatoes, which have a high starch content that ensures crispiness. Slice them paper-thin—about 1/16-inch—using a mandoline for even thickness, then pat them completely dry to remove excess moisture.
The oven does the heavy lifting here, baking them at 425°F until they’re crispy and golden, with just a few minutes of shaking the tray midway to promote even cooking.
What you’ll end up with is a batch of light, airy, and addictively crispy chips that taste fresh from the oven. They’re perfect for snacking straight out of the bag, pairing with dips, or even serving as a side dish for burgers or tacos.
The best part? No deep-fryer or oil splatter in sight—just clean, simple, and delicious results.
For extra flavor, sprinkle with sea salt, garlic powder, or smoked paprika before baking, or toss them in seasoning after they’ve cooled. Store in an airtight container for up to 3 days, though they rarely last that long. Let’s get started on your crunchy masterpiece!
Ingredients for roasted potato chips
Two pounds of russets, a mandoline, and 25 minutes of oven magic. Crispier than store-bought, healthier too.
| Ingredient | Amount | Notes |
|---|---|---|
| Russet Potatoes 🥔 | 2 lbs | Organic preferred, uniform size |
| Extra-Virgin Olive Oil 🫒 | ¼ cup | Light variety for crispiness |
| Diamond Crystal Kosher Salt 🧂 | 1 ½ tbsp | Fine grain for even coating |
| Garlic Powder 🧄 | 1 tbsp | Freshly ground for bold flavor |
| Smoked Paprika 🌶️ | 1 tsp | For smoky depth (optional) |
| Baking Sheet 🍳 | 2 whole | Heavy-duty, rimmed |
| Paper Towels 🧻 | 4 sheets | For thorough drying |
| Mandoline Slicer ✂️ | 1 whole | 1/16-inch thickness setting |
| Aluminum Foil 📄 | 1 sheet | For easy transfer |
Russet potatoes are non-negotiable here—their high starch content is what gives you that perfect crunch. Trader Joe’s and Whole Foods carry organic russets that stay fresh longer, but any russet will work if you use them within a week. Grab a mandoline slicer—it’s a game-changer for even slices. I’ve tried hand-slicing, but the thickness varies, and that means uneven cooking. If you don’t have one, a sharp knife and steady hands work, but it’s tedious. Look for potatoes that feel heavy for their size—those are the starchy ones you want. And don’t skip the drying step! Even a little moisture will turn your chips into sad, limp snacks instead of crispy perfection.
No olive oil? Avocado oil or melted butter works in a pinch, but olive oil’s light flavor lets the potato shine. Short on smoked paprika? Regular paprika or cayenne for heat adds a different but delicious twist. The kosher salt is key—it dissolves evenly, so every chip gets that perfect salty crunch. No garlic powder? Fresh garlic minced into the oil before tossing adds a bold punch. And if you’re feeling fancy, toss the chips with parmesan cheese powder after baking for a cheesy kick. The baking sheets? Heavy-duty is a must—they conduct heat better and prevent warping. Line them with foil for easy cleanup, but make sure to use fresh foil each time to avoid sticking.
These chips are best served fresh from the oven, but they’ll keep their crunch for 3 days in an airtight container. Reheat in the oven at 350°F for 5 minutes to restore crispiness. For a crowd, double the recipe—just make sure your oven can handle two trays at once. I like to portion mine into small jars or bags for easy snacking. Pro tip: If you’re making these for a party, set up a DIY seasoning station with bowls of salt, garlic powder, and paprika so guests can customize their own. Trust me, they’ll disappear faster than you can say ‘crunch.’
Why You'll Love This Recipe
- No-Fuss Prep: I swear by this recipe because it’s basically set it and forget it—just slice those Russets thin, toss with olive oil, and let the oven do the work. No fancy gadgets, no waiting for chips to fry perfectly every time.
- Crispy-Creamy Magic: That first bite? Chef’s kiss. The smoked paprika gives it a subtle smokiness, while the garlic powder keeps it bright—crunchy outside, tender inside, and way better than store-bought.
- Party Snack Hero: Honestly, this is my secret weapon for game day, potlucks, or even lazy Sundays. Toss them in a jar, and suddenly you’re the host who actually brought something everyone will eat.
- Budget Crunch Savior: Russets are cheap, and a single bag stretches to feed a crowd. Leftovers? Just reheat them until crispy again—no waste, no guilt, and way cheaper than buying chips by the bag.
Step-by-step instructions for homemade crunchy roasted potato chips
Transform humble russet potatoes into addictively crispy chips with this foolproof oven method—no deep fryer needed!
Prepare the Potatoes for Even Slicing
Start by washing the 2 lbs russet potatoes thoroughly under cold water to remove any surface dirt. Use a vegetable peeler to strip away the skin, working carefully to avoid cutting into the potato flesh. The goal is to create uniform slices that will cook evenly—this is where precision pays off.
Cut each potato in half lengthwise, then slice into ½-inch thick rounds using the mandoline slicer set to 1/16-inch thickness. Work in batches if needed, keeping the slices on a separate baking sheet lined with paper towels. The mandoline ensures consistent thickness, which is crucial for even crispiness. Arrange the slices in a single layer, leaving space between each—this prevents steaming and promotes crispy edges.
Dry Thoroughly Before Seasoning
Pat the potato slices dry with the 4 sheets paper towels, pressing firmly to remove all moisture. This drying step is non-negotiable—any residual water will prevent the olive oil from clinging properly and result in soggy chips. I like to work in small batches, using fresh paper towels for each round to ensure maximum absorption.
Once completely dry, transfer the slices to a large bowl and toss gently with the 0.25 cup extra-virgin olive oil. The light variety is ideal because it has a lower smoke point, ensuring the chips crisp rather than burn. Distribute the oil evenly, coating each slice lightly but completely. This is your flavor foundation—don't skip it, even if it seems like too little oil.
Season Generously and Arrange for Perfect Crisp
In a small bowl, whisk together the 1.5 tbsp diamond crystal kosher salt, 1 tbsp garlic powder, and 1 tsp smoked paprika. Sprinkle this seasoning blend evenly over the oiled potato slices, tossing gently to ensure full coverage. The fine grain of the kosher salt ensures an even distribution, while the garlic powder and smoked paprika add depth that store-bought chips can't match.
Line the 2 whole baking sheets with aluminum foil for easy transfer. Arrange the seasoned potato slices in a single layer on the prepared sheets, spacing them about ½ inch apart. This spacing is critical—crowding leads to uneven cooking and steamed spots. For extra crispiness, I like to flip each slice once with a thin spatula to ensure both sides get equal exposure to the heat.
Roast at High Heat for Maximum Crunch
Preheat your oven to 425°F, using the top rack for maximum heat circulation. Place the baking sheets on the top and middle racks simultaneously—this dual-rack approach ensures even cooking. Roast for 18-22 minutes, checking frequently after the 15-minute mark. You're looking for edges that turn golden brown while the centers remain slightly pale—this is the sweet spot for crispy-yet-tender chips.
Watch carefully during the last few minutes—potatoes can go from perfect to burnt in seconds. If any slices brown too quickly, remove them to a wire rack and continue roasting the rest. The key is to pull them out when they're still slightly underdone—they'll crisp up more as they cool. Transfer the finished chips to a serving bowl immediately, as they'll lose crispness rapidly once removed from the oven.
Serve Immediately for Peak Crunch
Let the chips cool for exactly 2-3 minutes before serving—this brief rest allows them to firm up slightly while maintaining their crisp texture. Serve in a single layer to preserve that irresistible crunch. These homemade chips are best enjoyed immediately, but if you must store them, keep them in an airtight container for up to 24 hours—they'll lose some crispness but still taste incredible.
The secret to success lies in the preparation: uniform slicing, thorough drying, and precise seasoning. When done right, you'll have chips that are lighter, crispier, and packed with flavor—far superior to anything you can buy in a bag. Trust the process, and you'll be rewarded with a snack that's worth the effort every single time.
Pro Tips For Making Roasted Potato Chips
- Cut Thin, Cut Even: Russets are starchy but stubborn—slice them paper-thin (⅛-inch or less) with a mandoline (or a sharp knife, but don’t be lazy). Uneven slices mean some burn while others stay doughy. I learned this the hard way after tossing out a tray of lumpy, half-raw chips.
- Toss Like You Mean It: Drizzle that olive oil lightly—just enough to coat—but then shake the tray aggressively before roasting. The oil needs to spread evenly, or you’ll end up with greasy patches and dry spots. Think of it like seasoning a salad: thoroughness matters.
- Salt Before Roasting: Skip the post-roast salt fest—sprinkle kosher salt right after tossing with oil. It clings better to the wet surface and crisps into the chips as they roast. I used to salt after, and the flavor always felt like an afterthought.
- Rotate the Tray: Your oven’s hot spots are real, and potato chips will burn in one corner while staying pale in another. Flip the tray halfway through and swap racks if needed. Yes, it’s a pain, but it’s the only way to guarantee even crispiness.
Pro cooking tips for perfect results
Oven Temperature Secrets
Your oven’s 425°F setting is non-negotiable for crispy chips, but here’s the pro move: preheat for at least 15 minutes with the racks positioned top and middle. This creates a convection effect that circulates hot air evenly, preventing soggy centers.
I use an oven thermometer to verify accuracy—many home ovens run 25°F hotter or cooler than set. Adjust accordingly for perfect results every time. 🌡️
Mandoline Mastery
That 1/16-inch thickness setting on your mandoline is everything—any thicker, and your chips turn out chewy. Angle the blade slightly (about 15 degrees) for ultra-thin slices without tearing. Work in batches, keeping slices on paper towels to absorb moisture immediately.
I’ve tried hand-slicing with a knife, but the thickness varies wildly, leading to uneven cooking. Invest in a $20 mandoline—it’s the single best tool for this recipe. ✂️
Drying Like a Pro
Skipping the drying step is the #1 rookie mistake. After slicing, pat each slice with fresh paper towels for 2-3 minutes—longer is better. I press down firmly with my fingers to squeeze out every drop of moisture.
Pro tip: Use a clean kitchen towel to wipe the baking sheet before arranging slices—this prevents sticking. Even a tiny bit of moisture will steam your chips instead of crisping them. 🧻
Seasoning Timing
Season after tossing with oil, not before. The oil creates a barrier that helps spices cling evenly. For maximum flavor, sprinkle seasoning in two stages: half before baking, then toss again with the remaining half after the first 10 minutes in the oven.
This two-step method ensures every chip gets that perfect salty-crunchy coating. 🧂
Shake the Tray
At the 15-minute mark, shake each baking sheet vigorously (wear oven mitts!) to redistribute the chips. This prevents overlapping and promotes even browning. I give it a good 10-second shake—you’ll hear the chips rattling like popcorn.
This simple trick cuts cook time by 2-3 minutes while ensuring consistent crispiness across the batch. 🔥
The 2-Minute Rest
Resist the urge to dig in immediately! Let chips rest on a wire rack for exactly 2-3 minutes—this allows residual heat to set the starches, locking in crispness. Serve directly from the rack to prevent soggy piles.
For parties, portion chips into small paper cones or jars—they stay crunchier longer than a shared bowl. And if you must store them? Re-crisp at 350°F for 5 minutes** before serving. ⏰
Nutrition facts
Frequently asked questions
Why do my homemade chips turn out soggy instead of crispy?
Moisture is the enemy of crispiness! The #1 culprit is skipping the drying step—pat slices with paper towels for 2-3 minutes to remove all moisture. Also, check your oven temperature with a thermometer (many ovens run 25°F off) and avoid overcrowding on the baking sheet. Space slices ½ inch apart for even airflow.
Can I use sweet potatoes instead of russets?
Yes, but with adjustments! Sweet potatoes have more moisture, so slice them ⅛-inch thick (thicker than russets) and bake at 400°F for 20-25 minutes. Toss with a bit of cinnamon or cayenne for extra flavor. The texture will be slightly denser but still delicious.
How do I make these chips spicy or cheesy?
For spicy chips, toss cooled chips with ½ tsp cayenne + 1 tbsp olive oil and bake at 350°F for 3 minutes to reactivate the spices. For cheesy, mix ¼ cup parmesan powder + 1 tsp garlic powder and sprinkle after baking. Store in an airtight container to prevent sogginess.
Can I bake these in an air fryer instead?
Preheat air fryer to 400°F, arrange slices in a single layer (no overlapping), and cook for 12-15 minutes, shaking every 5 minutes. Reduce oil to 1 tbsp since air fryers circulate heat differently. The result? Crispier edges with less mess!
Why do some chips burn while others stay raw?
Uneven thickness or overlapping slices causes this. Use a mandoline for consistent 1/16-inch slices, and shake the tray at 15 minutes to redistribute. For stubborn spots, remove burned chips early and continue roasting the rest. Pro tip: Rotate trays halfway if your oven has hot spots.