Side Dishes
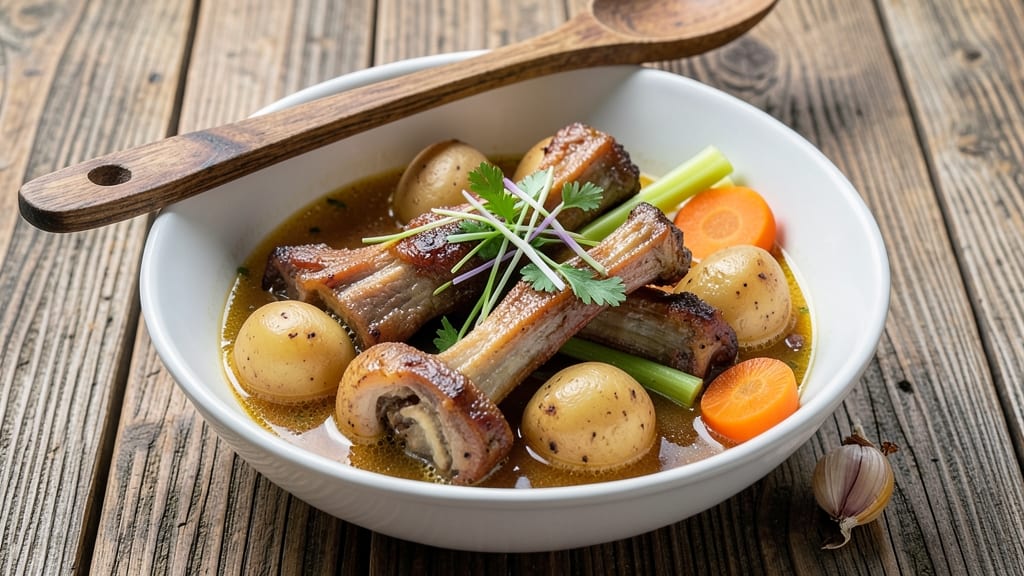
This boiled neck bones and potatoes recipe delivers hearty, broth-infused comfort in every bite, transforming simple ingredients into a deeply satisfying one-pot meal.
The secret lies in simmering neck bones until the broth becomes rich and flavorful, then using that same liquid to cook tender potatoes until they absorb all that savory depth.
I first discovered this technique while researching traditional Southern cooking methods—where every element works together to create a meal that feels like a warm hug on a chilly day.
The beauty of this dish is its simplicity: just three core components—neck bones, potatoes, and aromatics—come together to form a dish that’s both rustic and refined. You’ll start by browning the bones to build flavor, then simmer them long enough to extract gelatinous richness from the marrow.
Meanwhile, the potatoes cook in that same fragrant broth, soaking up every layer of taste without needing extra seasoning. The result? A dish that’s hearty enough for a family dinner but easy enough for a weeknight.
What makes this recipe truly special is how the broth transforms the potatoes—turning them from plain to irresistibly tender, with just the right amount of bite. The bones contribute collagen that thickens the broth naturally, while the potatoes develop a creamy texture without needing butter or cream.
Serve it as a standalone side or pair it with grilled meats for a meal that feels like a homecoming. The aroma alone will have everyone gathering around the table, ready for seconds.
This method also works beautifully for meal prep: the broth can be made ahead and stored, while the potatoes can be reheated in it for maximum flavor retention. Whether you're recreating a classic Southern tradition or simply craving a comforting, one-pot wonder, this recipe delivers restaurant-quality results with minimal effort.
Let’s get started on creating that perfect balance of richness and simplicity.
Ingredients for boiled neck bones and potatoes
Three core ingredients transform into a deeply comforting one-pot meal with rich, broth-infused flavor.
| Ingredient | Amount | Notes |
|---|---|---|
| Beef Neck Bones 🦴 | 4 lb | Beef marrow bones preferred |
| Russet Potatoes 🥔 | 4 lb | Cut into 2-inch chunks |
| Yellow Onion 🧅 | 1 whole | Quartered, skin on |
| Carrots 🥕 | 4 whole | Cut into 2-inch pieces |
| Celery Stalks 🥬 | 4 whole | Cut into 2-inch pieces |
| Garlic Cloves 🧄 | 6 cloves | Smashed, skin on |
| Fresh Thyme 🌿 | ¼ cup | Stems removed, chopped |
| Bay Leaves 🌿 | 2 whole | Dried, standard size |
| Salt 🧂 | 2 tbsp | Kosher or sea salt |
| Black Peppercorns 🌶️ | 1 tbsp | Crushed, not ground |
| Apple Cider Vinegar 🍏 | 2 tbsp | For brightness |
| Cold Water 💧 | 8 cups | Enough to cover bones |
The beef neck bones are the foundation here—look for marrow bones at your local butcher or specialty grocery like Whole Foods for the best flavor. Freshness matters: bones should smell clean, not fishy, and have a vibrant red marrow. If you're using frozen bones, thaw them overnight in the fridge. The Russet potatoes should be firm with no sprouts—Idaho potatoes work perfectly too. For the aromatics, organic carrots and celery from the store's produce section add natural sweetness. Fresh thyme is ideal, but dried works in a pinch (use half the amount).
No fresh thyme? Dried thyme or oregano (half the quantity) keeps the dish aromatic. Running low on vinegar? Lemon juice works just as well for brightness. The bones can be substituted with chicken backs or veal bones for a lighter broth, though beef delivers the deepest flavor. For a quicker version, pre-cut frozen potato chunks (thawed) save time without sacrificing texture. The key is balancing the salt—kosher salt dissolves better than table salt, so measure carefully.
This dish tastes even better the next day as flavors meld. Store the broth and potatoes separately in airtight containers for up to 5 days in the fridge. The broth freezes beautifully for 3 months—just thaw overnight before reheating. For meal prep, portion the potatoes into containers and keep the broth on hand to reheat together. The aroma alone will draw everyone to the table, making it perfect for family dinners or holiday gatherings.
Why You'll Love This Recipe
- One-Pot Magic: I swear by this recipe—just toss everything in a pot, add water, and walk away. The neck bones soften perfectly while the potatoes stay tender, no flipping or fussing required. Between us, that’s my kind of cooking.
- Deep, Savory Richness: The beef neck bones melt into the broth, turning it into something luxurious without trying. The onions and celery add a sweet, earthy base, and those crispy potatoes? They’re the star—crunchy outside, fluffy inside.
- Meal Prep Gold: This dish tastes even better the next day, honestly. I make a big batch on Sundays, and it feeds the family for days—whether it’s reheated for lunch or turned into soup. My kids actually ask for leftovers.
- Budget-Friendly Feast: Neck bones are cheap, and they stretch across multiple meals. Add a few potatoes and veggies, and suddenly you’ve got a hearty, filling dinner that won’t break the bank. (Yes, even on a Tuesday night.)
Step-by-step instructions for boiled neck bones and potatoes
This one-pot method delivers deep, flavorful broth while tenderizing potatoes for maximum comfort.
Prepare the Bones for Maximum Flavor
Rinse the 4 lb beef neck bones thoroughly under cold water to remove any surface debris. This ensures your broth starts with a clean slate. Pat them dry with paper towels, then place them in a large stockpot. I like to use marrow bones if available—they add rich gelatinous texture to the finished dish.
Add the 8 cups cold water to the pot with the bones. Bring to a boil over high heat, then immediately reduce to a gentle simmer. Skim off any foam or impurities that rise to the surface during the first 10 minutes using a fine-mesh skimmer. This step is crucial—it removes impurities that could make your broth cloudy and bitter. Let the bones simmer uncovered for 30 minutes to extract initial flavors.
Add Vegetables and Build the Base
After the initial 30 minutes, add the quartered yellow onion, 2-inch carrot pieces, 2-inch celery pieces, and smashed garlic cloves to the pot. These vegetables form the aromatic base that infuses flavor into both the broth and potatoes. Stir gently to combine, then return to a simmer.
Add the 2 whole bay leaves and 0.25 cup chopped fresh thyme. These herbs will develop slowly, contributing earthy depth to the broth. Let everything simmer uncovered for 45 minutes, maintaining a gentle bubble. You'll notice the vegetables soften slightly and release their natural sweetness into the liquid. This is when the foundational flavors begin melding together.
Incorporate Potatoes and Seasonings
Add the 4 lb russet potatoes cut into 2-inch chunks to the simmering pot. The potatoes should be partially submerged—they'll absorb both broth and flavor as they cook. Stir once to distribute them evenly. Add the 2 tbsp salt and 1 tbsp crushed black peppercorns, then pour in the 2 tbsp apple cider vinegar. The vinegar brightens the broth and helps tenderize the potatoes.
Return to a gentle simmer and cook uncovered for 1 hour. The potatoes should be tender when pierced with a fork, but still hold their shape. You'll know they're ready when they're fork-tender but not falling apart. The broth should be rich and golden, with visible sediment from the bones and vegetables. This is where that comforting, homey flavor develops.
Finish and Serve with Confidence
Remove the pot from heat and let it sit covered for 10 minutes. This resting period allows the potatoes to absorb any remaining broth and the flavors to fully meld. The potatoes should be perfectly tender with a creamy texture, while the broth remains rich and flavorful.
Ladle the potatoes and broth into serving bowls, ensuring each portion gets generous amounts of both. The broth should coat the back of a spoon, indicating proper thickness. Serve immediately while hot, as this dish tastes best straight from the pot. The combination of tender potatoes in flavorful broth creates that quintessential comfort food experience.
Pro Tips For Making Boiled Neck Bones And Potatoes
- Parboil Bones First: I learned this the hard way—skipping the initial parboil means tough, chewy bones. Simmer the neck bones in fresh water for 15 minutes before adding everything else. This softens connective tissue and lets them absorb flavor better later.
- Cut Potatoes Evenly: Uneven potato sizes mean some cook mushy while others stay raw. Use a knife to slice them all 1.5–2 inches thick—no need for perfect cubes. Russets hold up better than you’d think, but consistency matters.
- Don’t Crowd the Pot: I used to pack the pot like a sardine can, and the potatoes turned out soggy. Leave 1 inch of space between them so heat circulates. If needed, cook in batches—your broth will thank you.
- Save the Broth: Dumping that rich, gelatinous broth after the bones are done is a crime. Strain it, reduce it slightly, and use it for gravy or another meal. That’s where half the flavor hides—don’t waste it.
Flavor customization for boiled neck bones and potatoes
Herb Variations
Swap the thyme for rosemary or sage if you prefer earthier notes—just use 1 tbsp of each instead of thyme. I find fresh rosemary sprigs add a piney brightness that pairs beautifully with the beefy broth.
For a Southern-inspired twist, add ½ tsp smoked paprika during the final 30 minutes of cooking—it deepens the flavor without overpowering. 🌿
Spice Adjustments
Add ½ tsp cayenne pepper or 1 tsp crushed red pepper flakes for heat, stirring it in with the salt and peppercorns. If you love bold flavors, 1 tsp ground coriander adds a citrusy warmth that complements the vinegar.
For a smoky kick, ½ tsp chipotle powder (mixed with the broth in the last 15 minutes) transforms this into a Mexican-inspired stew.
Vegetable Swaps
Replace carrots with parsnips for a slightly sweeter, nuttier flavor—just use the same 2-inch chunks. Sweet potatoes work too, but they take 10-15 minutes longer to cook through.
For a lighter touch, add 1 cup green beans or zucchini in the last 20 minutes of cooking—they’ll soften just enough to absorb the broth without turning mushy.
Protein Enhancements
Drop in 1 lb smoked sausage (like Andouille) or diced bacon during the final 30 minutes for extra richness. I love crumbled chorizo for a Spanish-inspired twist—it adds smoky depth and a slight spice.
For a lighter option, poached chicken thighs in the last 20 minutes soak up the broth beautifully.
Acid Balance
Swap the apple cider vinegar for lemon juice (same amount) or white wine (½ cup) to brighten the broth. A splash of fish sauce (1 tsp) adds umami depth, especially if you’re making this a Southeast Asian-inspired dish.
For a tangy finish, stir in 1 tbsp Dijon mustard at the end—it cuts through the richness while adding complexity. 🍋
Texture Contrasts
Top with crispy fried shallots or toasted breadcrumbs for crunch. I also love crumbled feta cheese (2 tbsp) for a salty contrast, or pickled red onions (¼ cup) for a bright, tangy bite.
For a heartier finish, crumbled blue cheese adds a bold, creamy element that pairs perfectly with the beefy broth.
Nutrition facts
Frequently asked questions
Can I use chicken or pork neck bones instead of beef?
Yes, but the flavor will differ significantly. Chicken or pork bones create a lighter broth with less richness. For chicken, use 5-6 lb of bones to compensate for the smaller yield. Pork bones work well but may have a stronger, gamier taste. Beef marrow bones are ideal for that deep, gelatinous texture and robust flavor that makes this dish so comforting.
How do I know when the potatoes are perfectly tender?
Test with a fork or skewer—they should slide in easily but still hold their shape. If they're mushy, they've overcooked. For extra assurance, cut one chunk open: the flesh should be creamy but not falling apart. The broth should also be rich and golden, not watery. This usually takes 1 hour of simmering for 2-inch chunks.
Can I make this dish ahead of time?
The broth can be made 1-2 days ahead and stored in the fridge. For best results, cook the potatoes separately and reheat them in the broth for 10-15 minutes before serving. The flavors actually improve overnight as the broth deepens. Freeze the broth for up to 3 months—just thaw it slowly in the fridge before reheating.
Why does my broth look cloudy?
Cloudiness usually means impurities weren't skimmed properly or the bones weren't cleaned well. Always rinse bones thoroughly and skim foam during the first 10 minutes of simmering. For extra clarity, strain the broth through a fine-mesh sieve before serving. If using older bones, they may release more sediment—this is normal and adds body to the broth.
What's the best way to serve this dish?
This hearty one-pot meal works perfectly as a standalone dinner or alongside grilled meats like steak or pork chops. For extra flair, garnish with fresh parsley, a drizzle of hot sauce, or a sprinkle of toasted breadcrumbs. Pair with crusty bread to soak up the rich broth. It also makes a fantastic lunch the next day—just reheat gently to preserve the texture.