Desserts
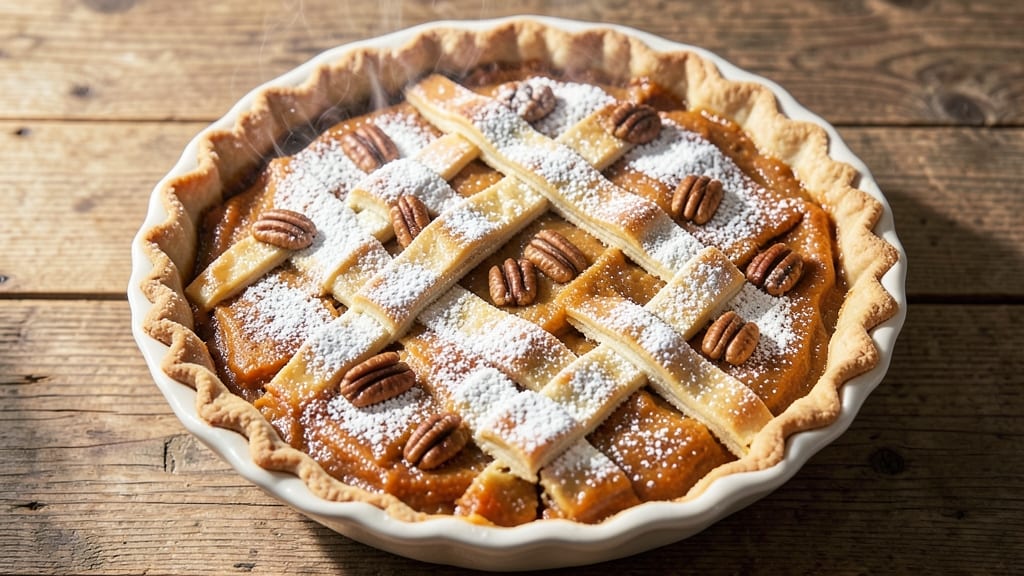
Grandma's sweet potato pie recipe brings warmth to every holiday table with its signature spiced filling and flaky crust. The secret lies in roasting sweet potatoes until tender, blending them into a velvety mixture with just the right balance of cinnamon, nutmeg, and brown sugar.
This is the pie that inspired family gatherings, its aroma filling the kitchen long before the golden crust emerges from the oven.
What makes this recipe truly special is the harmony between traditional techniques and simple execution. We'll use a homemade crust for that classic flakiness, but store-bought works perfectly if you're short on time.
The filling requires only a few key ingredients—no artificial flavors here—just wholesome spices and perfectly cooked sweet potatoes that create that signature smooth, slightly caramelized texture.
By the time it bakes, you'll have a pie with a perfectly golden crust that contrasts beautifully with the creamy orange filling. The spices infuse every bite with that nostalgic warmth you remember from childhood holidays, while the sweet potatoes provide natural sweetness that doesn't overpower the delicate spice blend.
This is comfort food at its finest, guaranteed to become your new holiday tradition.
The best part? This recipe delivers restaurant-quality results with just 30 minutes of active prep time. Whether you serve it warm with whipped cream or let it cool for perfect slices, it's the kind of dessert that makes every occasion feel special.
Let's get started on creating your family's new favorite pie tradition.
Ingredients for grandma's sweet potato pie
Sweet potatoes, warm spices, and buttery crust—everything you need for Grandma's legendary pie.
| Ingredient | Amount | Notes |
|---|---|---|
| Medium Sweet Potatoes 🍠 | 4 whole | Organic preferred, skin-on |
| Unsalted Butter 🧈 | ½ cup | Cold, cubed for crust |
| All-Purpose Flour 🌾 | 2 cups | Plus 1 tbsp for rolling |
| Granulated Sugar 🍚 | 1 ½ cups | Light brown sugar works too |
| Packed Brown Sugar 🍚 | ½ cup | For filling's caramel depth |
| Large Eggs 🥚 | 2 whole | Room temperature for crust |
| Ground Cinnamon 🌿 | 2 tbsp | Freshly ground preferred |
| Ground Nutmeg 🌿 | 1 tsp | Freshly grated nutmeg better |
| Ground Ginger 🌿 | 1 tsp | Fresh ginger root preferred |
| Salt 🧂 | ½ tsp | Fine sea salt preferred |
| Pure Vanilla Extract 🍯 | 1 tbsp | High-quality vanilla preferred |
| Heavy Whipping Cream 🥛 | ½ cup | Full-fat for best texture |
| Evaporated Milk 🥛 | ½ cup | For extra creaminess |
The sweet potatoes are the heart of this pie. Organic sweet potatoes from the grocery store's produce section (look for vibrant orange skin) work best—they're sweeter and creamier. I always roast mine at 400°F until fork-tender, about 45 minutes, then mash them smooth. If you're short on time, canned sweet potato puree (unsweetened) is a decent shortcut, but fresh always wins. For the spices, Penzeys or local spice shops carry the freshest ground cinnamon and nutmeg—worth the splurge if you're making this often. The brown sugar should be packed, not clumpy, for that perfect caramelized depth in the filling.
No brown sugar? White sugar plus 1 tsp molasses mimics the flavor. Short on butter? Vegetable shortening works for the crust, but butter gives that unmatched flakiness. The vanilla extract can be imitation, but high-quality Madagascar bourbon vanilla makes it taste like Grandma's. For the filling, if you're making it ahead, I like to add 1 tbsp lemon juice to keep the color bright. The heavy cream and evaporated milk combo makes the filling ultra-smooth—don't skip it if you want that restaurant-quality texture. And if you're feeling fancy, a pinch of cardamom adds an unexpected but delicious depth.
The crust keeps best in the freezer for up to 3 months, wrapped tightly in plastic. The filling can be made a day ahead and stored in the fridge—it actually tastes better the next day as the flavors meld. If you're prepping for Thanksgiving, I recommend making the filling and crust separately, then assembling the day before baking. The pie itself stays fresh for 3-4 days at room temperature, but I always serve it warm with a scoop of vanilla ice cream. Leftovers? Reheat slices in the oven for 5 minutes at 350°F—they warm up beautifully.
Why You'll Love This Recipe
- Sweet Potato Simplicity: I swear by this recipe because it’s the kind of dessert that doesn’t demand your full attention—just roast the potatoes until tender, mash them with butter until smooth, then fold in the sugars and flour. No fancy techniques, no stress.
- Caramel-Kissed Magic: That perfect balance of brown sugar’s deep molasses notes and granulated sugar’s crisp sweetness? It’s what makes this pie dangerously good. The butter melts into the potatoes, turning every bite into a warm, velvety hug.
- Holiday or Snack Attack: Between us, this pie works for Thanksgiving and lazy Sunday afternoons. Serve it warm with whipped cream for company, or grab a slice straight from the fridge when you’re craving something sweet. No judgment.
- Budget-Friendly Luxury: Sweet potatoes and butter stretch further than you’d think, and this recipe uses pantry staples you already own. Plus, leftovers? They’re even better the second day—if they last that long.
Step-by-step instructions for Grandma's sweet potato pie
Here's how to create that legendary silky filling and flaky crust—just like Grandma used to make.
Prepare the Sweet Potato Filling
Preheat your oven to 375°F. Peel and dice the 4 whole medium sweet potatoes into ½-inch cubes. Place them in a medium saucepan and cover with water by about 1 inch. Add a pinch of the 0.5 teaspoon salt to help season the potatoes as they cook.
Bring to a boil over medium-high heat, then reduce to a simmer and cook for 10-12 minutes until the sweet potatoes are fork-tender. Drain them thoroughly in a colander, then return them to the saucepan. Mash them until completely smooth—no lumps allowed. This is your base for the filling.
While the potatoes cook, melt the 0.5 cup unsalted butter in a small saucepan over low heat. Once melted, remove from heat and let it cool slightly. This butter will add incredible richness to your filling. In a large mixing bowl, combine the mashed sweet potatoes with the melted butter, 1.5 cups granulated sugar, 0.5 cup packed brown sugar, 2 tablespoons ground cinnamon, 1 teaspoon ground nutmeg, 1 teaspoon ground ginger, and the remaining 0.5 teaspoon salt. Mix thoroughly until all the spices are evenly distributed.
Make the Creamy Filling Mixture
In a separate bowl, whisk together the 2 whole large eggs and 1 tablespoon pure vanilla extract until well combined. This mixture will create the silky texture that makes this pie so special. Gradually pour the egg mixture into the sweet potato mixture while whisking constantly to prevent lumps from forming.
Next, stir in the 0.5 cup heavy whipping cream and 0.5 cup evaporated milk. Mix until completely smooth and creamy. The filling should be thick but still pourable. Here's the thing—if your filling looks too thick, don't worry. It will thicken even more as it bakes, so it's better to err on the thinner side now.
Taste the filling and adjust the sweetness if needed. You want it to be perfectly balanced between sweet and spiced. If it needs more sweetness, add a bit more of the granulated sugar or packed brown sugar. Once satisfied, transfer the filling to a medium bowl and set aside while you prepare the crust.
Prepare the Pie Crust
In a large bowl, combine the 2 cups all-purpose flour and the additional 1 tablespoon flour for rolling. Cut in the 0.5 cup cold unsalted butter using a pastry cutter or your fingers until the mixture resembles coarse crumbs. This step is crucial for creating a flaky crust. If the butter starts to melt, chill the bowl for a few minutes to firm it up again.
Gradually add 4-6 tablespoons of ice water (you may not need all of it) to the flour mixture, stirring gently with a fork until the dough just comes together. Be careful not to overwork it—just mix until it forms a shaggy mass. Turn the dough out onto a lightly floured surface and knead it gently 4-5 times until it holds together. Wrap the dough in plastic wrap and refrigerate for at least 30 minutes.
Roll out the chilled dough on a lightly floured surface to a 12-inch circle, about ⅛-inch thick. Carefully transfer the dough to a 9-inch pie dish, trimming any excess dough hanging over the edges. Crimp the edges with your fingers or a fork to create a decorative border. Prick the bottom of the crust with a fork to prevent puffing during baking.
Assemble and Bake the Pie
Pour the sweet potato filling into the prepared pie crust, spreading it evenly. The filling should come up to about ½-inch from the top edge of the crust. If you have any leftover filling, you can use it to make a smaller individual pie or sweet potato muffins.
Bake the pie in the preheated oven for 50-55 minutes until the filling is set and the crust is golden brown. To check if the pie is done, gently shake the pan—if the filling doesn't jiggle, it's ready. If the edges of the crust start to brown too quickly, cover them with aluminum foil to prevent burning.
Remove the pie from the oven and let it cool completely on a wire rack. This cooling step is essential—it allows the filling to set properly and prevents it from being runny when you slice into it. Once cooled, you can serve the pie at room temperature or refrigerate it for up to 3 days. Enjoy your homemade sweet potato pie with a dollop of whipped cream or a scoop of vanilla ice cream!
Pro Tips For Making Grandma'S Sweet Potato Pie
- ROAST THEM FIRST: Sweet potatoes straight from the bag? Skip the boiling. Roast whole at 400°F (200°C) for 45-50 minutes—until a knife slides in like butter. This concentrates their natural sweetness and gives you perfectly smooth mash without watery texture. (Yes, even if you're impatient like me.)
- MASH WITH DRY HEAT: After roasting, split those potatoes open while they're still piping hot. Instead of drowning them in milk or butter right away, let them sit uncovered for 3-4 minutes. The residual heat evaporates extra moisture, so when you mash, you’ll need less flour later—and your filling stays thick and creamy.
- WEIGH THE FLOUR: That 1 cup of all-purpose flour in the recipe? Use a kitchen scale instead. Spooning flour into a measuring cup packs it too tightly, and you’ll end up with a filling that’s either gluey or grainy. Aim for 120 grams—it’s the sweet spot for a tender, not gummy, texture.
- BUTTER TEMPERATURE MATTERS: Take that unsalted butter out of the fridge 20 minutes before mixing. Cold butter creates pockets in the filling that steam during baking, leading to cracks or a dense center. Softened butter blends smoothly, ensuring that silky, custard-like finish grandma’s version is famous for. (I learned this the hard way—cracked pie is a tragedy.)
Make-ahead tips for grandma's sweet potato pie
Filling Prep Ahead
Make the filling one day in advance—it actually tastes better after flavors meld overnight. Store it in an airtight container in the fridge. When ready to bake, let it sit at room temperature for 30 minutes before pouring into the crust.
This prevents condensation issues and ensures a smooth, creamy texture. 💡
Crust Make-Ahead
Roll out and shape the crust, then wrap it tightly in plastic wrap. Store in the fridge for up to 48 hours or freeze for 3 months. Thaw overnight in the fridge before assembling.
For extra flakiness, blind-bake the crust (pre-bake with pie weights) and store it at room temperature until ready to fill. This shortcut saves 30 minutes of prep day-of.
Assembled Pie Storage
Assemble the pie (unbaked) and refrigerate for up to 24 hours before baking. This lets the filling soak into the crust slightly, creating a more cohesive texture. If baking immediately, preheat the oven to 375°F—no need to thaw.
For a Thanksgiving hack, assemble the pie the night before and bake in the morning while you prep other dishes. 📅
Baked Pie Preservation
Once baked, let the pie cool completely on a wire rack. Store at room temperature for 3-4 days or refrigerate for up to 1 week. To reheat slices, warm in the oven at 350°F for 5 minutes—this restores the filling’s creamy consistency.
For longer storage, freeze individual slices wrapped in plastic for up to 2 months. Thaw overnight in the fridge before serving.
Filling Variations
Double the filling recipe and freeze half for future pies. Add 1 tbsp lemon juice to the filling before storing to preserve color. For a spiced twist, mix in ½ tsp cardamom or ¼ tsp cloves with the dry spices.
These adjustments work perfectly when prepped ahead and baked later. The flavors deepen over time, making it ideal for holiday prep. ✨
Equipment Shortcuts
Use a food processor to mash sweet potatoes if short on time—just pulse until smooth. For the crust, chill the dough between rolls if it becomes sticky.
Store pie weights or dried beans in a ziplock bag in the freezer for quick blind-baking. These small tweaks streamline the process without sacrificing quality. 💪
Nutrition facts
Frequently asked questions
Can I use canned sweet potatoes instead of fresh?
Yes, but with a few adjustments! Use 15 ounces unsweetened canned sweet potato puree (about 2 cups) instead of fresh. Add 2 tablespoons extra brown sugar and 1 extra tablespoon cinnamon to compensate for the different moisture levels. The texture will be slightly smoother but still delicious.
How do I prevent a soggy bottom crust?
Prevent soggy crust by pre-baking the crust for 10 minutes at 375°F before adding filling, or by sprinkling ½ cup crushed cornflakes or graham crackers on the bottom before pouring in the filling. This creates a barrier that keeps the crust crispy. Another trick is to chill the assembled pie for 30 minutes before baking.
Can I make this pie gluten-free?
Replace the all-purpose flour with a 1:1 gluten-free flour blend (like Bob's Red Mill) for the crust. For the filling, use a gluten-free thickener like cornstarch or arrowroot powder (1 tbsp) mixed with the eggs to ensure proper setting. The texture may be slightly different but still delicious.
What's the secret to extra flaky crust?
The secret lies in cold butter and minimal handling. Keep all ingredients cold, cut the butter into the flour using a pastry cutter, and avoid overworking the dough. Also, use ice water (not warm) to bind the dough—this creates steam pockets that make the crust flaky. Chill the dough for at least 30 minutes before rolling.
How do I know when the pie is fully baked?
The pie is done when the filling is set (no jiggle in the center when gently shaken) and the crust is golden brown. Insert a knife near the center—if it comes out clean or with just a few moist crumbs, it's ready. If the crust browns too quickly, cover the edges with aluminum foil after 20 minutes of baking.