Side Dishes
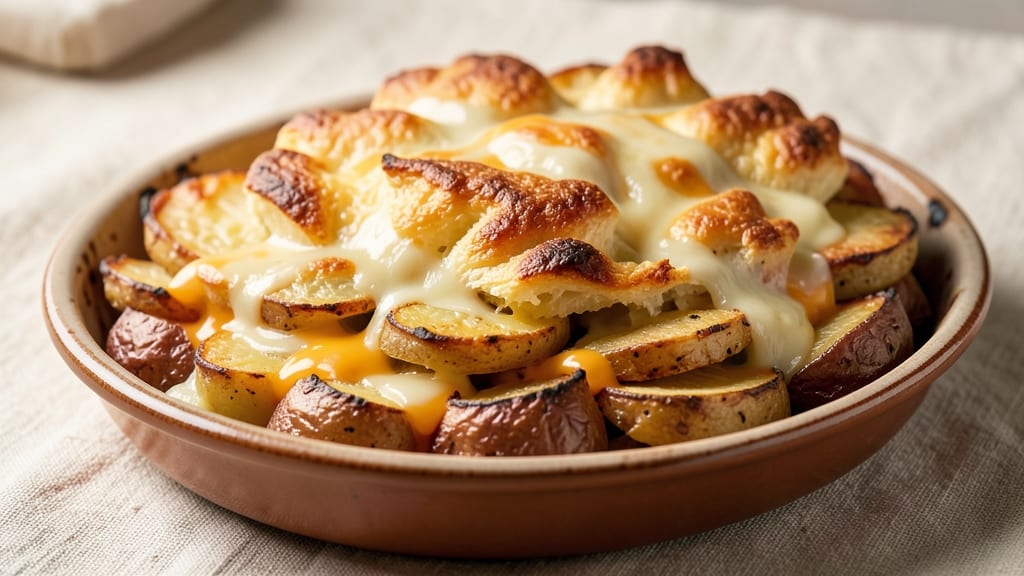
The original Betty Crocker scalloped potato recipe brings homey comfort to any table with its creamy, golden layers of potatoes and cheese. This classic dish has been a kitchen staple for generations, offering rich texture and nostalgic flavor in every bite.
The secret to its success lies in precise layering and baking, ensuring tender potatoes and a perfectly crisp top.
What makes this recipe special is its simplicity—just a few ingredients transform into a dish that feels like a warm hug. Potatoes, cream, cheese, and butter work together to create that signature creamy, cheesy goodness, while seasonings like salt and pepper enhance the natural flavors.
The baking process is straightforward, but attention to detail ensures the best results every time.
By the time it emerges from the oven, you'll have a dish that's creamy inside, golden on top, and packed with that unmistakable Betty Crocker charm. The layers hold together beautifully, making it easy to serve and enjoy.
This recipe is perfect for family dinners, holiday meals, or whenever you crave a taste of home.
For those looking to modernize the classic, substitutions like vegan cheese or coconut cream can adapt this dish to different dietary needs without sacrificing flavor. Let’s get started on recreating this timeless comfort food.
Ingredients for original betty crocker scalloped potato
Classic comfort in a casserole dish—potatoes, cream, and cheese layered to golden perfection.
| Ingredient | Amount | Notes |
|---|---|---|
| Russet Potatoes 🥔 | 3 lb | Thinly sliced, uniform thickness |
| Heavy Whipping Cream 🥛 | 1 ½ cups | Full-fat for best texture |
| Sharp Cheddar Cheese 🧀 | 2 cups | Freshly shredded, block preferred |
| Unsalted Butter 🧈 | ½ cup | Melted, for layering |
| Milk 🥛 | ½ cup | Whole milk for creaminess |
| Salt 🧂 | 1 tsp | Kosher or sea salt |
| Black Pepper 🌶️ | ½ tsp | Freshly ground preferred |
| Garlic Powder 🧄 | ½ tsp | For subtle depth |
| All-Purpose Flour 🌾 | 2 tbsp | For thickening cream mixture |
| Breadcrumbs 🍞 | ¼ cup | Panko for extra crunch |
| Parmesan Cheese 🧀 | ¼ cup | Freshly grated for topping |
The potatoes are the foundation, so Russet potatoes are non-negotiable—their starchy texture holds up beautifully during baking. Look for firm, unblemished tubers at Whole Foods or your local grocery store, and slice them uniformly for even cooking. The cheese matters too: sharp cheddar from a block (like Cabot) melts more smoothly than pre-shredded. For the cream, heavy whipping cream is essential—light cream won’t give the same rich, velvety finish. If you’re short on time, Costco’s Kirkland brand is a reliable budget-friendly option for both potatoes and cream.
No sharp cheddar? Gruyère or Monterey Jack work beautifully—just shred it yourself for better melt. Running low on heavy cream? Half-and-half plus 1 tablespoon butter per cup mimics the richness. The garlic powder can be swapped for 1/4 teaspoon minced fresh garlic if you’re feeling fancy. For the breadcrumbs, panko adds a delightful crunch, but regular breadcrumbs work in a pinch. The flour is purely for thickening, but if you’re gluten-free, cornstarch at the same amount does the trick. And if you’re avoiding dairy entirely, coconut cream and vegan cheese can replicate the creamy layers with a slightly different texture.
This dish tastes even better the next day, so make it ahead and bake it when you’re ready to serve. Store leftovers in an airtight container in the fridge for up to 4 days, and reheat covered in the oven at 350°F for about 15 minutes. For a crispier top, broil for 2-3 minutes at the end. The layers hold together surprisingly well, making it perfect for meal prep—just assemble it in a baking dish, refrigerate, and bake straight from the fridge for even cooking. The Parmesan topping adds a nice contrast, so don’t skip it if you’re serving it immediately.
Why You'll Love This Recipe
- No-Chop Nightmare: I swear by this one—just slice those Russets thick (no peeling needed!) and stack them like cordwood. The cream and butter do all the work while you sip coffee and pretend you’re not cooking.
- Cheddar-Cream Magic: That sharp cheddar melts into gooey rivers while the heavy cream makes every bite buttery and rich. Honestly, the first time I made this, I ate it straight from the pan—no shame.
- Leftovers for Days: This dish actually tastes better the next day, especially reheated with a sprinkle of extra cheese. I make a double batch Sunday night and feed my family for three meals without extra effort.
- Budget Comfort Food: Russets and cheddar are cheap staples, and this recipe stretches them into something fancy. Between us, this is my go-to when I need to impress guests without breaking the bank.
Step-by-step instructions for classic scalloped potatoes
Here's how to recreate that iconic Betty Crocker comfort dish with perfect layers and creamy perfection.
Prepare the Potatoes for Even Cooking
Peel the 3 lb russet potatoes and slice them into ¼-inch thick rounds using a mandoline or sharp knife. I find a mandoline gives the most uniform slices, which is crucial for even cooking. As you slice, soak the potatoes in cold water for 10 minutes to remove excess starch—this prevents the layers from becoming gummy. Drain thoroughly before using.
Real talk: If your slices aren't uniform, some will cook faster than others. The goal is for each layer to cook simultaneously, creating that signature creamy texture throughout. Pat the slices completely dry with paper towels before building your casserole—moisture creates steam instead of crispy layers.
Create the Creamy Cheese Mixture
In a medium saucepan, combine the 1.5 cups heavy whipping cream, 0.5 cup milk, 0.5 cup unsalted butter, 1 tsp salt, 0.5 tsp black pepper, and 0.5 tsp garlic powder. Place over medium heat and warm until the butter melts completely. In a separate small bowl, whisk together the 2 tbsp all-purpose flour with 2 tbsp cold water to make a slurry.
Slowly pour the flour slurry into the warm cream mixture while whisking constantly. Bring to a gentle simmer and cook for 3-5 minutes until the mixture thickens enough to coat the back of a spoon. Remove from heat and stir in the 2 cups freshly shredded sharp cheddar cheese until fully melted and smooth. Here's the thing—if you don't shred the cheese yourself, the pre-shredded kind contains anti-caking agents that prevent proper melting.
Assemble the Layers in the Baking Dish
Preheat your oven to 375°F. Butter a 9x13-inch baking dish generously—this prevents sticking and adds extra flavor. Begin layering by placing a third of the potato slices in the bottom of the dish, slightly overlapping them. Pour half of the cheese mixture over the potatoes, then sprinkle with half of the 0.25 cup breadcrumbs and half of the 0.25 cup parmesan cheese.
Repeat the layering process with another third of the potatoes, remaining cheese mixture, and the final third of potatoes. For the top layer, sprinkle the remaining breadcrumbs and parmesan cheese evenly over the potatoes. Press down gently on the top layer to ensure everything stays in place during baking. This layering technique creates the signature "scalloped" look while ensuring each bite has that perfect cheesy, creamy texture.
Bake to Golden Perfection
Cover the baking dish tightly with aluminum foil and bake for 45 minutes. After this initial baking time, remove the foil and bake for an additional 15-20 minutes until the top is golden brown and the edges are bubbling. You'll know it's done when the cheese on top has turned a beautiful golden color and the potatoes are tender when pierced with a fork.
I know it seems counterintuitive to cover it first, but this prevents the top from drying out while the bottom layers cook through. The final uncovered baking creates that crispy, cheesy crust we all love. If the top browns too quickly, tent it loosely with foil for the last 5 minutes of baking to prevent over-browning.
Rest and Serve Warm
Remove the scalloped potatoes from the oven and let them rest for 10 minutes before serving. This resting period allows the layers to set slightly, making it easier to slice and serve. The dish will be hot and bubbly—this is normal and ensures that each slice maintains its shape when you cut into it.
Serve immediately with your favorite green vegetable or a simple side salad. Each forkful should deliver tender potatoes, rich cheddar cheese, and that signature creamy sauce. If you're feeling fancy, garnish with additional freshly ground black pepper and a sprinkle of extra parmesan cheese right before serving. The flavors will be at their peak when served warm from the oven.
Pro Tips For Making Original Betty Crocker Scalloped Potato
- Parboil First: DESCRIPTION: Cut those Russets into ¼-inch slices, then boil them for 3 minutes before layering—this keeps them from falling apart when they hit the oven. I learned this the hard way after watching my first batch turn to mush halfway through baking.
- Shred Cheese Coarse: DESCRIPTION: Skip the fine grated cheese—use a box grater and pull it through the largest holes possible. The sharp cheddar needs room to melt evenly, not clump into a greasy paste. (Yes, it looks less fancy, but it tastes better.)
- Cover Early, Uncover Late: DESCRIPTION: Start with foil tented over the dish for the first 45 minutes to trap steam, then remove it for the last 15 minutes to let the top brown. The recipe might not say this, but this is how you get that creamy interior with a crispy golden crust.
- Whip Cream Cold: DESCRIPTION: Chill the heavy whipping cream in the fridge for 10 minutes before mixing it with milk and butter—it whips faster and keeps the sauce thicker longer. I used to just grab it from the fridge and wonder why my dish turned watery by the end.
Perfect pairings for this recipe
Classic Side Pairings
This rich, cheesy potato dish pairs beautifully with steamed green beans tossed in lemon butter—about 1.5 pounds with 2 tbsp lemon juice and 1 tbsp butter. The acidity cuts through the richness while keeping the dish light.
For a heartier option, serve with roasted Brussels sprouts at 425°F for 20 minutes, tossed with 1 tbsp olive oil and ½ tsp smoked paprika. 🥦
Protein Pairings
Add a pan-seared chicken breast (about 6 oz per serving) cooked to 165°F internal temperature for a complete meal. I like to season it with 1 tsp garlic powder and ½ tsp onion powder before cooking.
For a vegetarian option, grilled portobello mushrooms marinated in balsamic glaze (simmer ½ cup balsamic vinegar with 1 tbsp honey for 5 minutes) add earthy depth. 🍗
Bread & Garnishes
Serve with warm dinner rolls brushed with garlic herb butter (mix ¼ cup softened butter with 1 tsp minced garlic and 1 tbsp chopped parsley).
For garnishes, sprinkle the top with fresh chives or crispy fried onions (cook ½ cup onion rings in ¼ cup oil at 350°F for 8 minutes) for extra texture. 🍞
Dessert Complements
Balance the richness with a vanilla ice cream or apple crisp—both provide a cool, sweet contrast. For a lighter option, serve with whipped cream and a drizzle of caramel sauce (simmer 1 cup sugar and ½ cup heavy cream for 10 minutes).
A simple sliced pear with cinnamon adds freshness. 🍎
Beverage Pairings
A bold red wine like Cabernet Sauvignon or Merlot complements the dish’s richness, while a crisp white wine such as Chardonnay balances the creaminess. For non-alcoholic options, sparkling apple cider or iced tea with lemon refreshes the palate. 🍷
Make-Ahead Serving
If preparing ahead, assemble the dish in a baking dish, refrigerate for up to 24 hours, then bake straight from the fridge (add 10-15 minutes to baking time).
Serve with pre-cut veggies or pre-cooked proteins for a stress-free meal. The flavors actually deepen overnight, making it perfect for holiday gatherings. 📅
Nutrition facts
Frequently asked questions
Why do the layers in scalloped potatoes sometimes turn mushy?
Overcooking or uneven potato slices are the main culprits. Always use ¼-inch thick slices and soak them in cold water for 10 minutes before baking to remove excess starch. Pat them completely dry to prevent steaming, which makes the layers gummy. Bake uncovered for the last 15-20 minutes to develop that perfect crispy top.
Can I make this recipe without heavy cream?
Yes! For a lighter version, use half-and-half plus 1 tbsp butter per cup or substitute with coconut cream for a dairy-free option. The texture will be slightly less rich, but the cheesy, creamy flavor remains. Just reduce the milk by ¼ cup if using coconut cream to maintain balance.
What’s the best way to reheat leftovers?
Cover the dish with foil and reheat at 350°F for 15-20 minutes until warmed through. For a crispier top, broil for 2-3 minutes at the end. Avoid microwaving—it makes the layers soggy. Leftovers keep well in an airtight container for 4 days.
How do I know when the potatoes are fully cooked?
Use a fork to gently pierce the potatoes—they should slide in easily with no resistance. The cheese on top should be golden brown and bubbly, and the edges of the dish should be slightly crisp. If unsure, bake 5 more minutes and check again.
Can I use sweet potatoes instead of russets?
Sweet potatoes work, but the texture and flavor will differ. They’re naturally sweeter and softer, so reduce the baking time by 10-15 minutes and add ½ tsp cinnamon to complement their natural sweetness. For the classic Betty Crocker taste, stick with russets—they’re starchy and hold their shape better.